

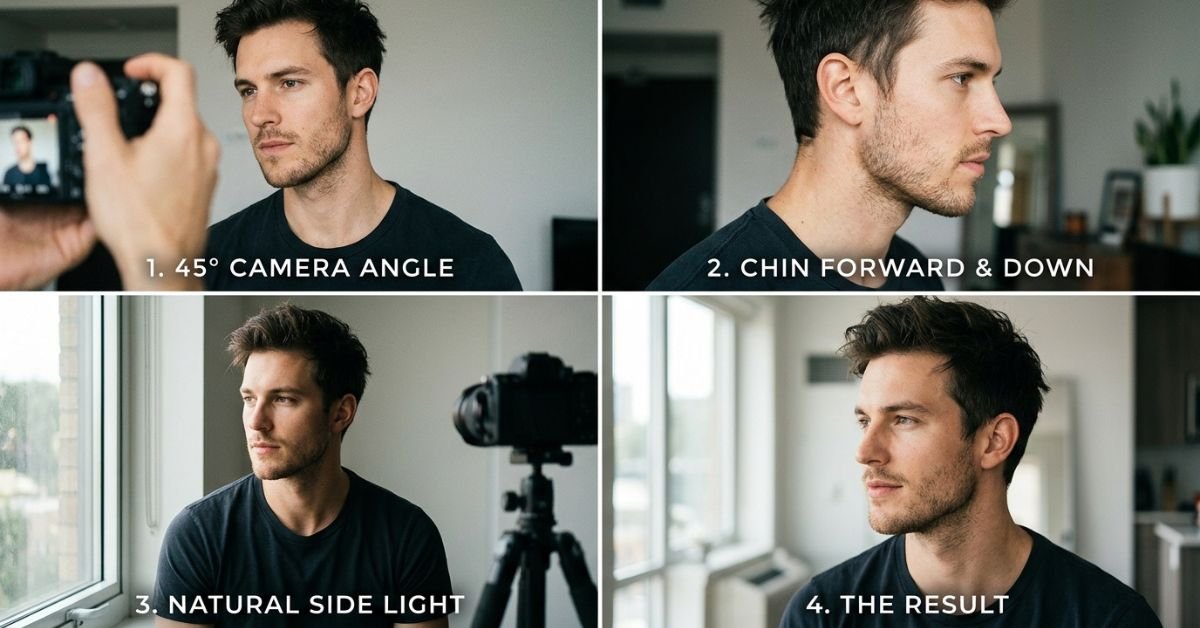
The jawline is the visible contour along the lower border of the jaw that separates the face from the neck, and in photos, a more defined jawline often creates a clearer, more balanced profile picture. Its appearance depends on more than facial structure alone: lighting, camera angles, posture, facial expression, and distance can dramatically change how your lower face looks in a shot.
If you’re updating a professional headshot, dating profile, or social media picture, knowing how these variables affect your jawline helps you present your natural features more confidently and get a flattering, accurate image without changing them. This guide explains the jawline itself, what influences how it photographs, practical lighting and posing adjustments, common mistakes to avoid, basic skincare factors, and how tools like Facefy can help you assess how your profile reads on camera.
Why Jawline Definition Matters in Profile Pictures
The jawline refers to the visible contour along the lower border of the jaw, separating the face from the neck.
Its appearance contributes to facial proportions, profile definition, and overall balance, and jawline appearance is also significantly influenced by lifestyle factors, even though those only create subtle visual changes rather than altering underlying structure. However, a sharp jawline isn’t essential for an attractive photograph. Softer, rounded contours can look equally harmonious.
The goal is to capture your natural facial structure using flattering lighting and positioning rather than forcing an exaggerated appearance.
What Actually Shapes Your Jawline?
Your jawline is primarily formed by the mandible, or lower jawbone. Several factors influence how clearly its outline appears.
Genetics and Bone Structure
Genetics determine jawbone size, structure, and facial shape, including jaw width, chin projection, mandibular angle, and facial proportions.
Jawbone structure is largely fixed after puberty, so photography cannot change these characteristics, but appropriate positioning can make existing contours more visible.
Body Fat Distribution
Natural fat distribution around the cheeks, chin, and neck influences facial fullness, and excess fat in these areas, including a double chin, can soften natural contours.
Some people have softer contours regardless of body weight. Reducing overall body fat may make the jawline more visible, though some fullness is still shaped by natural bone structure and fat distribution. Camera positioning can minimize unnecessary compression beneath the chin without changing your natural appearance.
Skin Elasticity
Collagen and elastin support skin firmness, but collagen production decreases with age, which can reduce firmness and elasticity in the lower face. Skincare that supports hydration and collagen production, such as retinol-based products, may help skin look firmer in photos without changing structure, and hydrated skin can make the jawline appear more defined.
Soft, directional lighting can highlight facial structure without emphasizing every skin texture or shadow.
Understanding Lighting for Better Jawline Photos
Lighting is one of the most important elements in photographing facial contours.
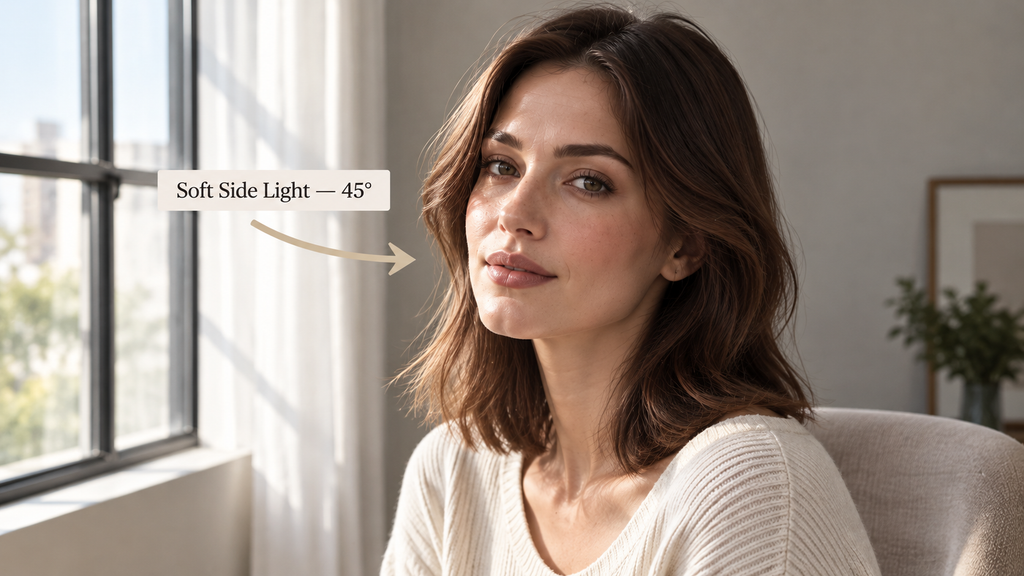
Use Soft Side Lighting
Position yourself near a window with natural light coming from approximately 45 degrees to one side.
This creates gentle shadows beneath the cheekbones and along the lower face, helping define the jaw without producing harsh contrast.
For anyone exploring how their jawline appears in photographs, Facefy offers a jawline rating feature that can provide an additional appearance-focused reference.
Using a clear, naturally lit photograph can make it easier to observe your facial proportions without distracting shadows or extreme camera distortion.
Avoid Harsh Overhead Lighting
Strong overhead light can produce deep shadows beneath the eyes and nose.
It may also create uneven contrast around the neck and chin.
Instead, choose soft window lighting or a diffused light source positioned slightly above eye level.
Experiment With Backlighting
Backlighting can create a subtle outline around your hair and shoulders.
However, excessive backlighting may leave your face underexposed.
Use gentle front fill lighting when necessary to maintain visible facial details.
Best Camera Angles for a Defined Jawline
The angle of your camera influences how prominent your chin, cheeks, and neck appear.
Position the Camera at Eye Level
Eye-level photography generally creates natural-looking facial proportions.
Position your phone or camera approximately level with your eyes rather than directly beneath your chin.
Low angles can exaggerate the underside of the jaw and make the neck appear compressed.
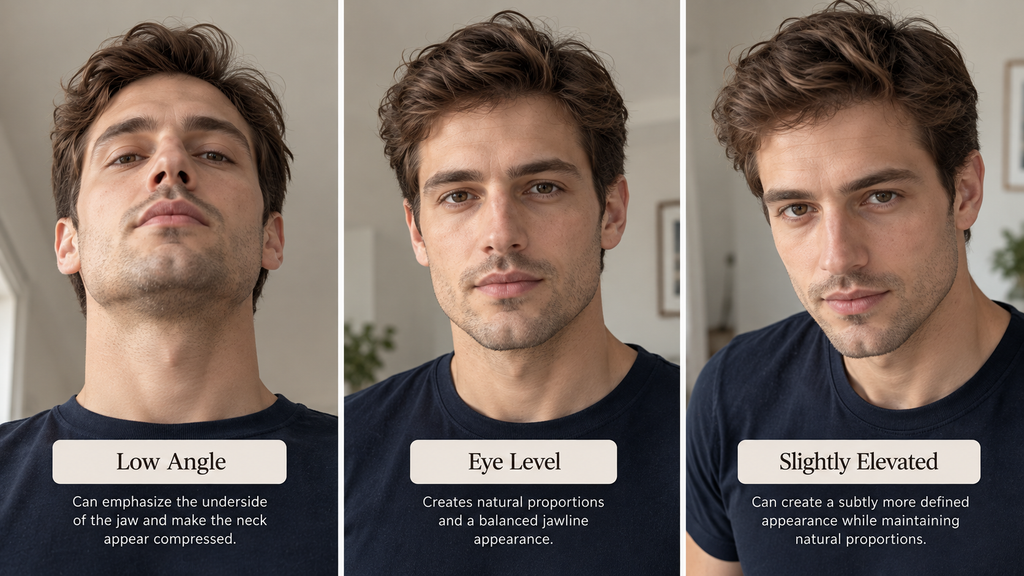
Try a Slightly Elevated Angle
A camera positioned slightly above eye level can create a flattering perspective.
However, excessively high angles may distort facial proportions or make the chin appear unusually small.
Small adjustments usually produce more natural results.
Turn Your Face Slightly
Instead of facing the camera completely straight, rotate your head approximately 15 to 30 degrees.
This three-quarter angle can reveal the transition between your cheek, jaw, and neck.
Experiment with both sides to identify your preferred perspective.
Keep Your Chin Naturally Positioned
Avoid lifting your chin excessively or pressing it tightly against your neck.
A relaxed position usually looks more comfortable and authentic.
How Posture Affects Jawline Photography
Posture influences how soft tissue sits beneath the chin.
Poor posture, especially forward head posture, can temporarily create fullness under the chin or make sagging skin show more in photos, so the lower face appears less defined.
For photographs, sit or stand upright with relaxed shoulders, and align your head with your spine to make the neck and jawline appear clearer.
Keep your neck comfortably elongated and your head balanced over your shoulders.
You can gently move your forehead forward slightly while keeping your chin level, but avoid exaggerated movements that create tension.
These adjustments affect photographic appearance rather than permanently changing facial structure.
How to Compare Your Profile Pictures With Facefy
Facefy provides appearance-related features, including face shape analysis and jawline assessment.
Its tools can serve as a useful reference when exploring how your facial features appear in different photographs.
For more meaningful comparisons, use pictures taken with similar lighting, camera distance, and head positioning.
Remember that appearance assessments are influenced by image quality and should not be treated as objective measures of attractiveness.
Camera Distance and Lens Distortion
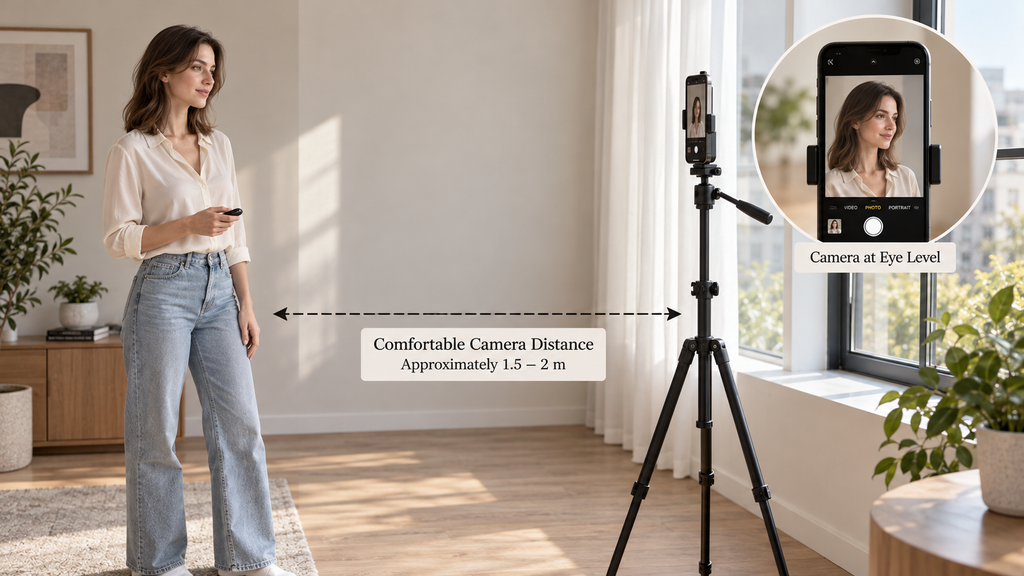
Camera distance can noticeably influence facial proportions.
Taking selfies extremely close to your face may exaggerate features nearest the lens, including the nose and chin.
For more natural-looking portraits, position the camera farther away and use a suitable portrait setting.
A tripod or phone stand can help maintain consistent distance and reduce accidental camera movement.
Avoid excessive digital zoom because it may reduce image quality.
Facial Expressions That Complement Your Jawline
Your expression affects the muscles around your cheeks, mouth, and jaw.
A relaxed smile can create an approachable appearance while maintaining natural facial definition.
Avoid clenching your teeth or deliberately tightening your jaw.
Excessive tension can make your expression appear uncomfortable and may aggravate existing jaw discomfort.
Try several expressions, including a gentle smile, neutral expression, and natural laugh.
Choose the photograph that best represents your personality.
Skincare and Grooming Before Your Photo Session
Healthy-looking skin can improve the overall appearance of your portrait.
Keep Skin Moisturized
Apply a suitable moisturizer before photographing, as a solid skincare routine can improve skin tone and firmness before a photo session.
Hydrated skin often appears smoother under natural lighting, which can create a slightly lifted appearance in pictures even though skincare does not change bone structure.
Avoid introducing unfamiliar skincare products immediately before an important session.
Use Sun Protection
Daily broad-spectrum sunscreen with SPF 30 or higher supports long-term skin health.
However, some sunscreen formulations may create visible shine or flashback under certain photographic conditions.
Test your products beforehand.
Consider Hair and Clothing Placement
Hair framing the cheeks can soften facial contours, while styles tucked behind the ears may reveal more of the jaw.
Choose clothing with a neckline that feels comfortable and doesn’t visually crowd your chin.
Common Jawline Photography Mistakes to Avoid
Several photography habits can make facial contours appear less natural.
- Shooting from below: Can exaggerate the underside of the chin.
- Using harsh lighting: Creates distracting shadows and uneven contrast.
- Standing too close: May distort facial proportions.
- Overediting photographs: Can create unrealistic facial shapes.
- Clenching your jaw: Produces unnecessary tension.
- Ignoring posture: May compress the neck and lower face.
Small adjustments to lighting and camera position often improve results more effectively than aggressive editing.
Do Jawline Exercises Improve Profile Pictures?
Jaw exercises, facial exercises, chewing gum, and mewing are frequently promoted as ways to create sharper jawlines.
However, scientific evidence supporting substantial cosmetic improvements remains limited.
While these routines may engage facial muscles, support muscle tone, and strengthen the muscular aponeurotic system in the jaw area and neck, they are not proven to permanently reshape adult bone structure.
Chin tucks may support comfortable neck posture, but they cannot reshape adult jawbones or meaningfully rebuild the jaw muscles.
Excessive gum chewing can aggravate jaw discomfort, while mewing has not been convincingly shown to alter adult facial structure.
For photography, any subtle effects from these habits are less reliable than the immediate visual impact of appropriate lighting, positioning, and camera distance.
Creating Facial Harmony in Your Profile Pictures
A flattering profile picture doesn’t require the sharpest possible jaw.
Facial harmony depends on how your lower face relates to your cheekbones, forehead, nose, and neck.
Someone with a naturally rounded jaw may prefer soft lighting, while a person with angular features may choose more diffused shadows.
Avoid comparing your appearance exclusively with heavily filtered celebrity photographs.
The most successful portrait is one that represents your natural features and personal style.
Final Tips for Photographing Your Jawline
Start with natural window lighting, position your camera near eye level, and experiment with subtle three-quarter angles.
Maintain a comfortable posture, keep your expression relaxed, and photograph yourself from a consistent distance.
Take several pictures rather than relying on one angle.
Ultimately, understanding lighting and perspective helps you create balanced, confident profile pictures without changing the facial features that make your appearance unique.